准备
- Mac(arm 系列)
- mumu 仿真器
https://mumu.163.com/mac/ - Magisk
https://github.com/HuskyDG/magisk-files/releases - Root Explorer Apk
https://rootexplorer.co/ - LSPosed module
https://github.com/LSPosed/LSPosed/releases - LSPosed app
https://lsposed.en.uptodown.com/android/download - WebViewDebugHook.apk
https://github.com/feix760/WebViewDebugHook?tab=readme-ov-file - Microsoft Edge PC 版
https://www.microsoft.com/en-us/edge/download?form=MA13FJ
安装
安装 mumu
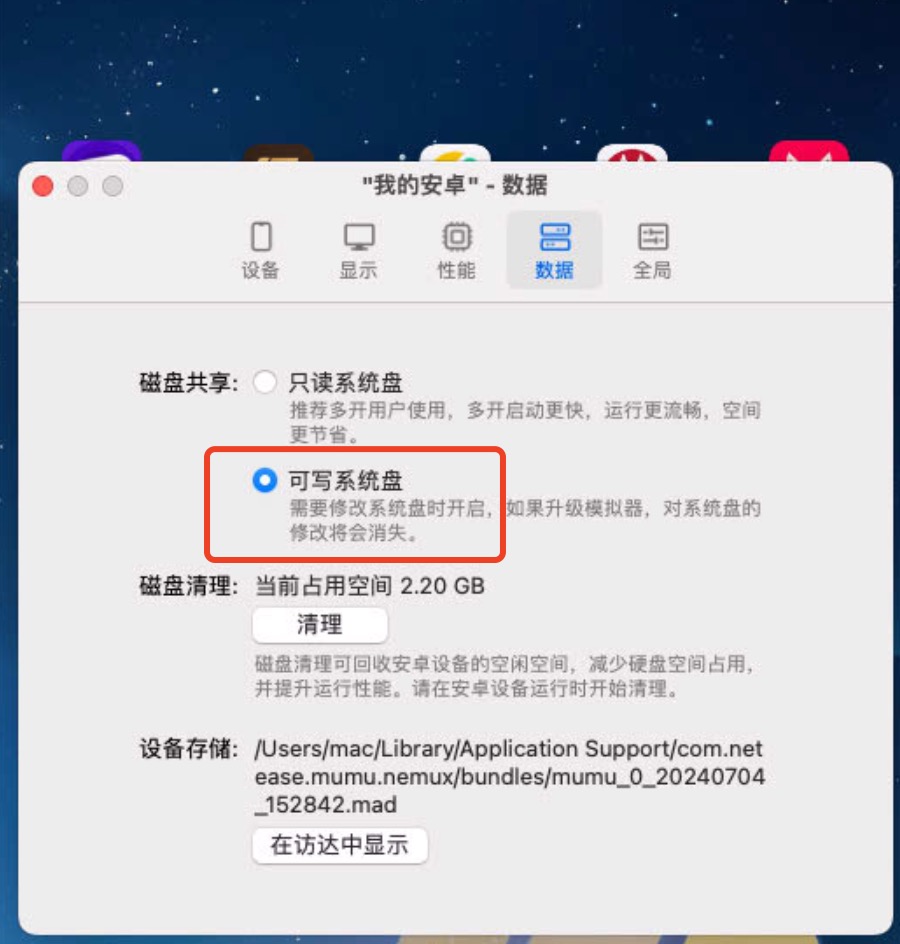
把上述下载的安装包安装后,开启 root 和磁盘读写权限,如下图:
设置完后,重启 mumu安装 Root Explorer apk
将下载好的安装包,拖到 mumu 仿真器中,即可安装 Magisk
a. 将下载好的安装包,拖到 mumu 仿真器中,将自动安装;然后启动 App,按照如下图操作: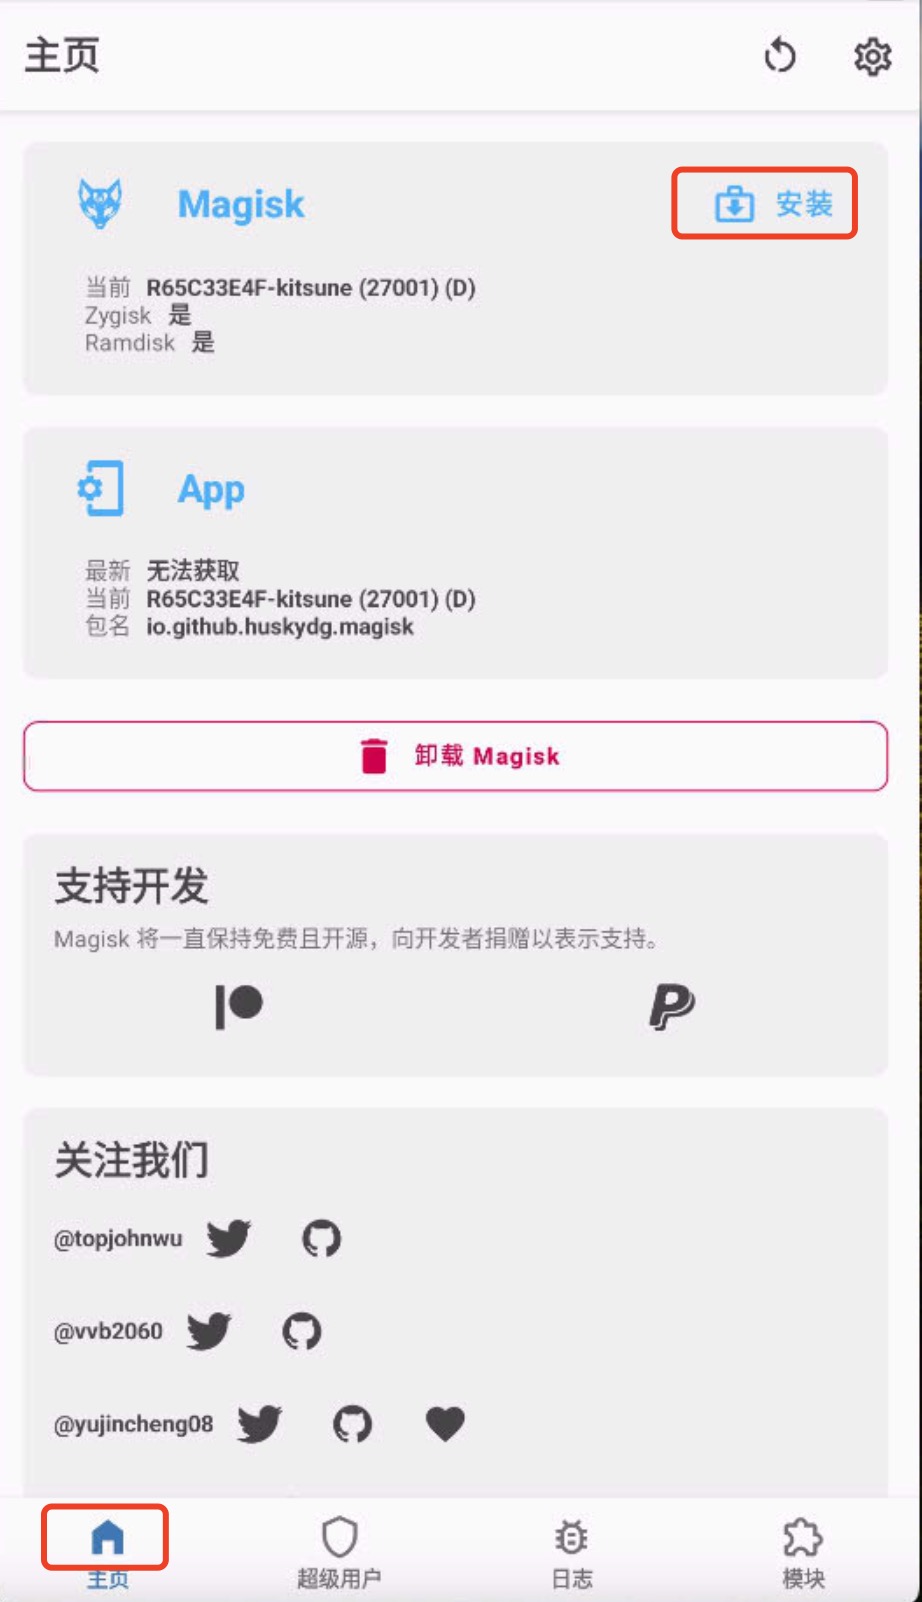
b. 删除 mumu 自带 su 文件
启动 Root Explorer App,进入/system/app,删掉 su 文件夹;再进入/system/sbin,删掉 su 文件
经过上述操作,magisk 启动将不会报错了安装 LSPosed 模块
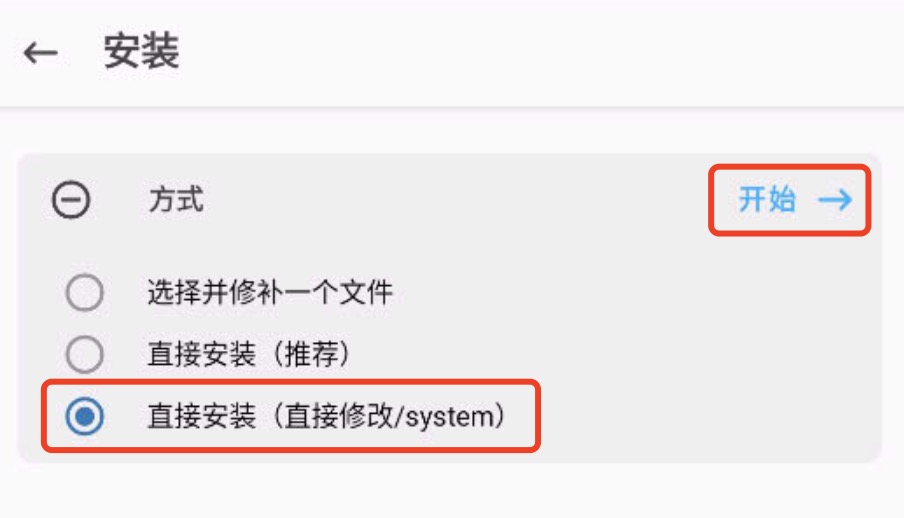
将LSPosed-v1.9.2-7024-zygisk-release.zip下载好,不用解压;打开 magisk App,如下操作: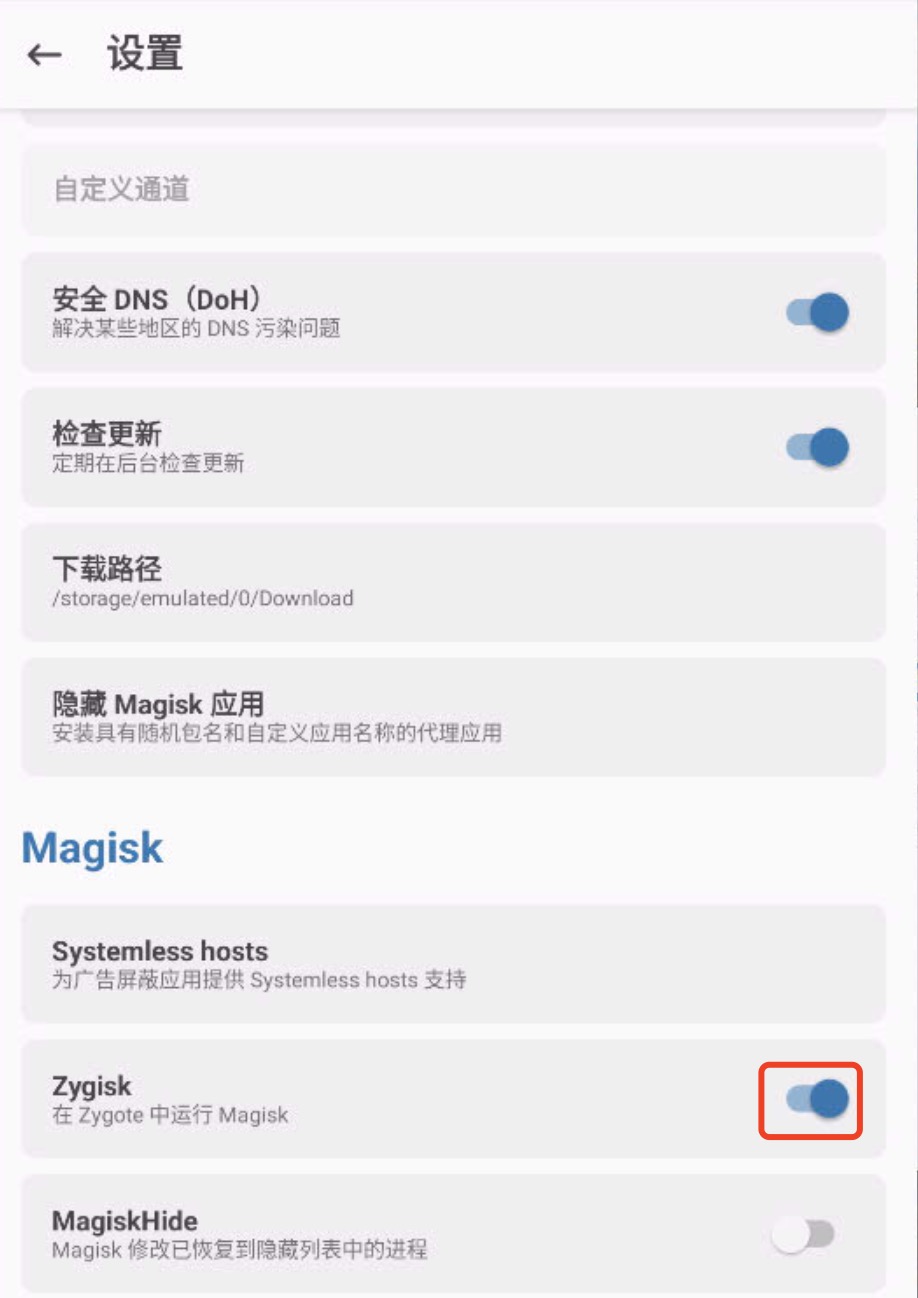

安装 LSPosed app
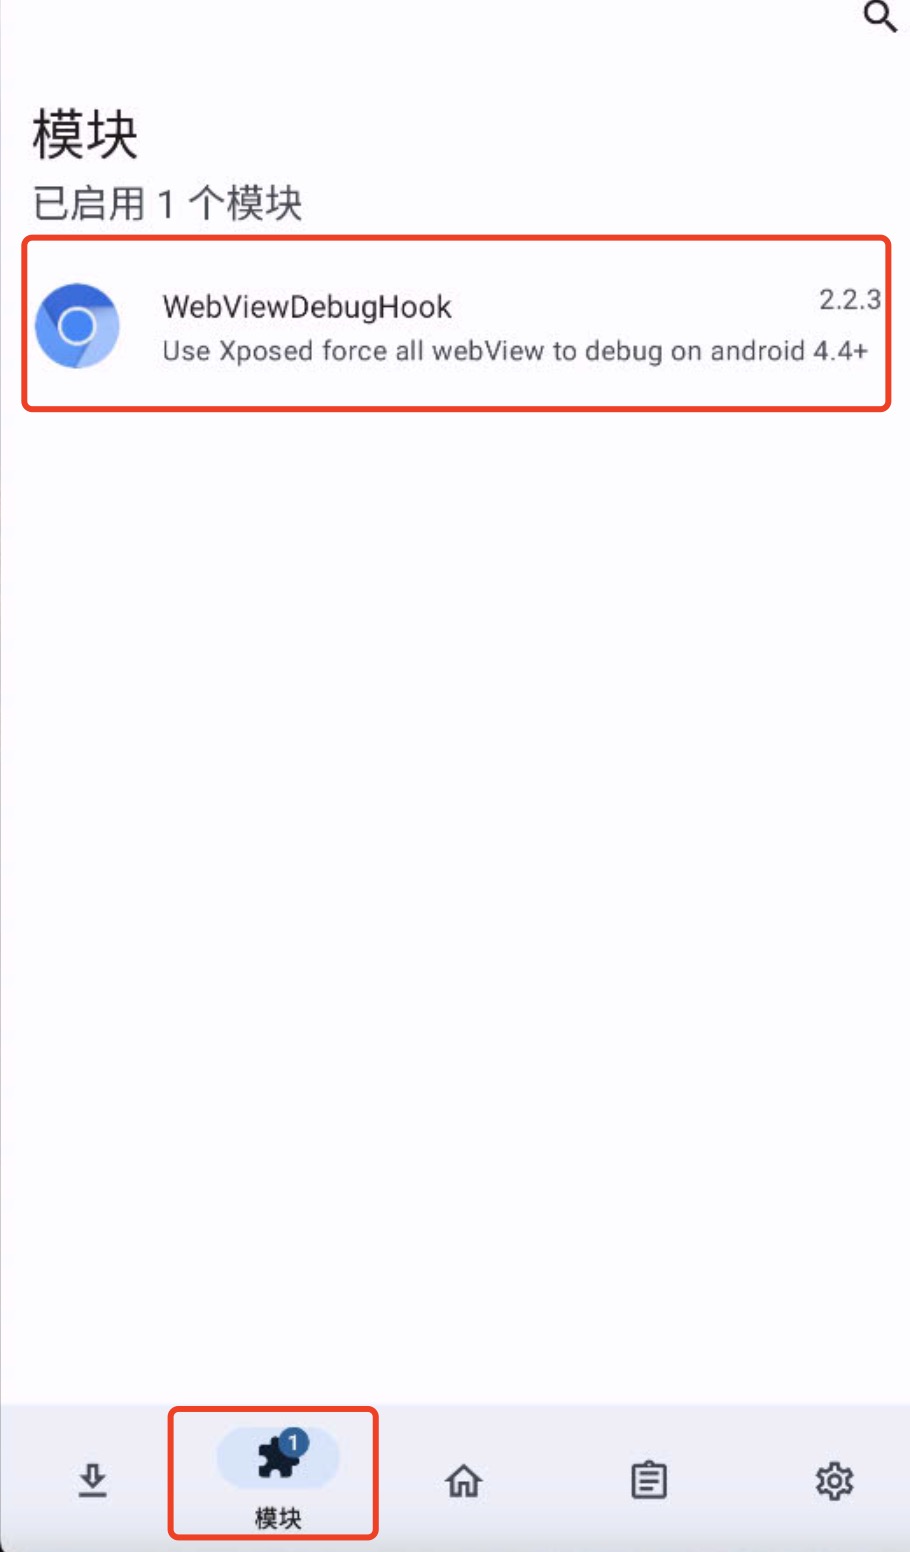
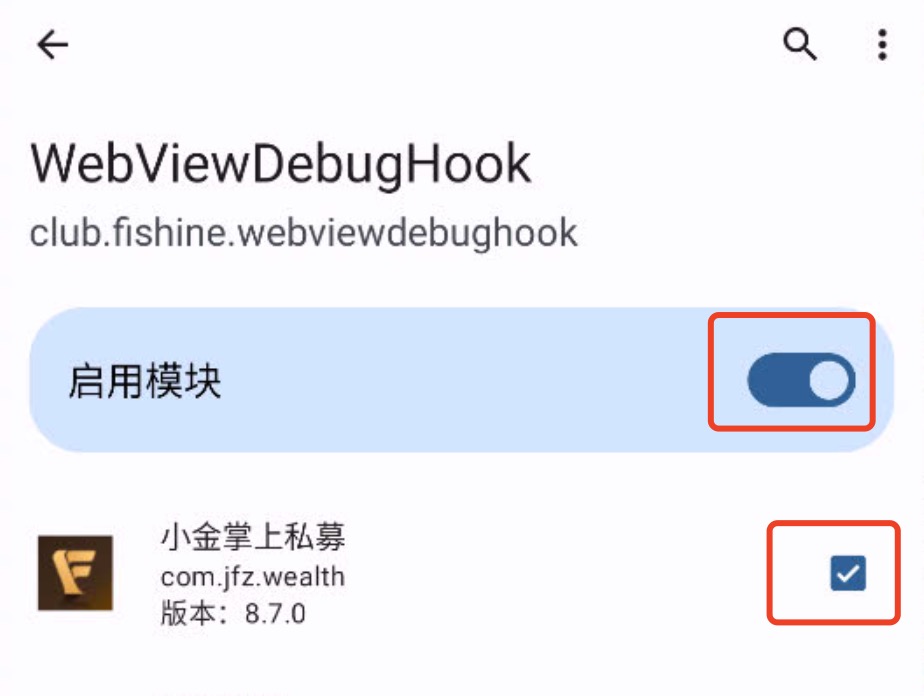
将下载好的安装包,拖到 mumu 仿真器中,即可安装 WebViewDebugHook.apk
将下载好的安装包,拖到 mumu 仿真器中,即可开启 webkit 的 debug 功能
打开 LSPosed App,按照如下操作: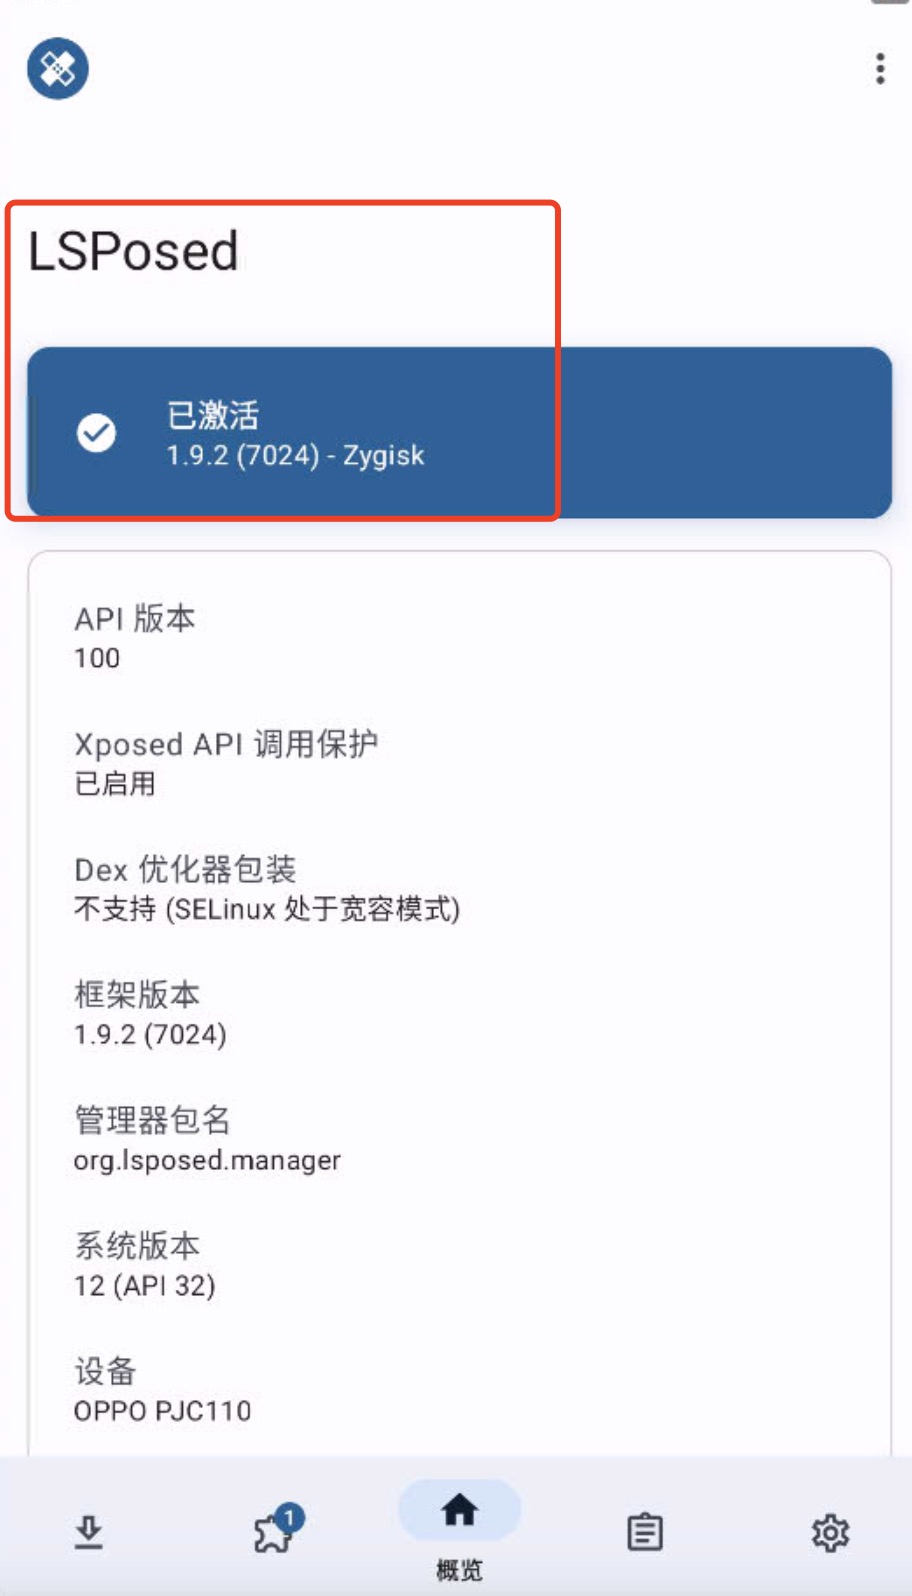
图一是确定 LSPosed 模块是否安装成功;mumu 开启 adb
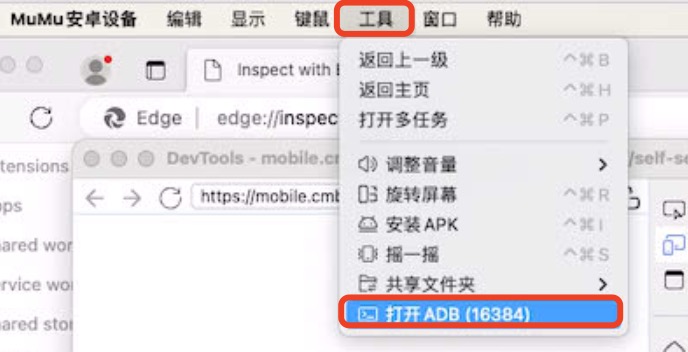
安装 Microsoft Edge 桌面版
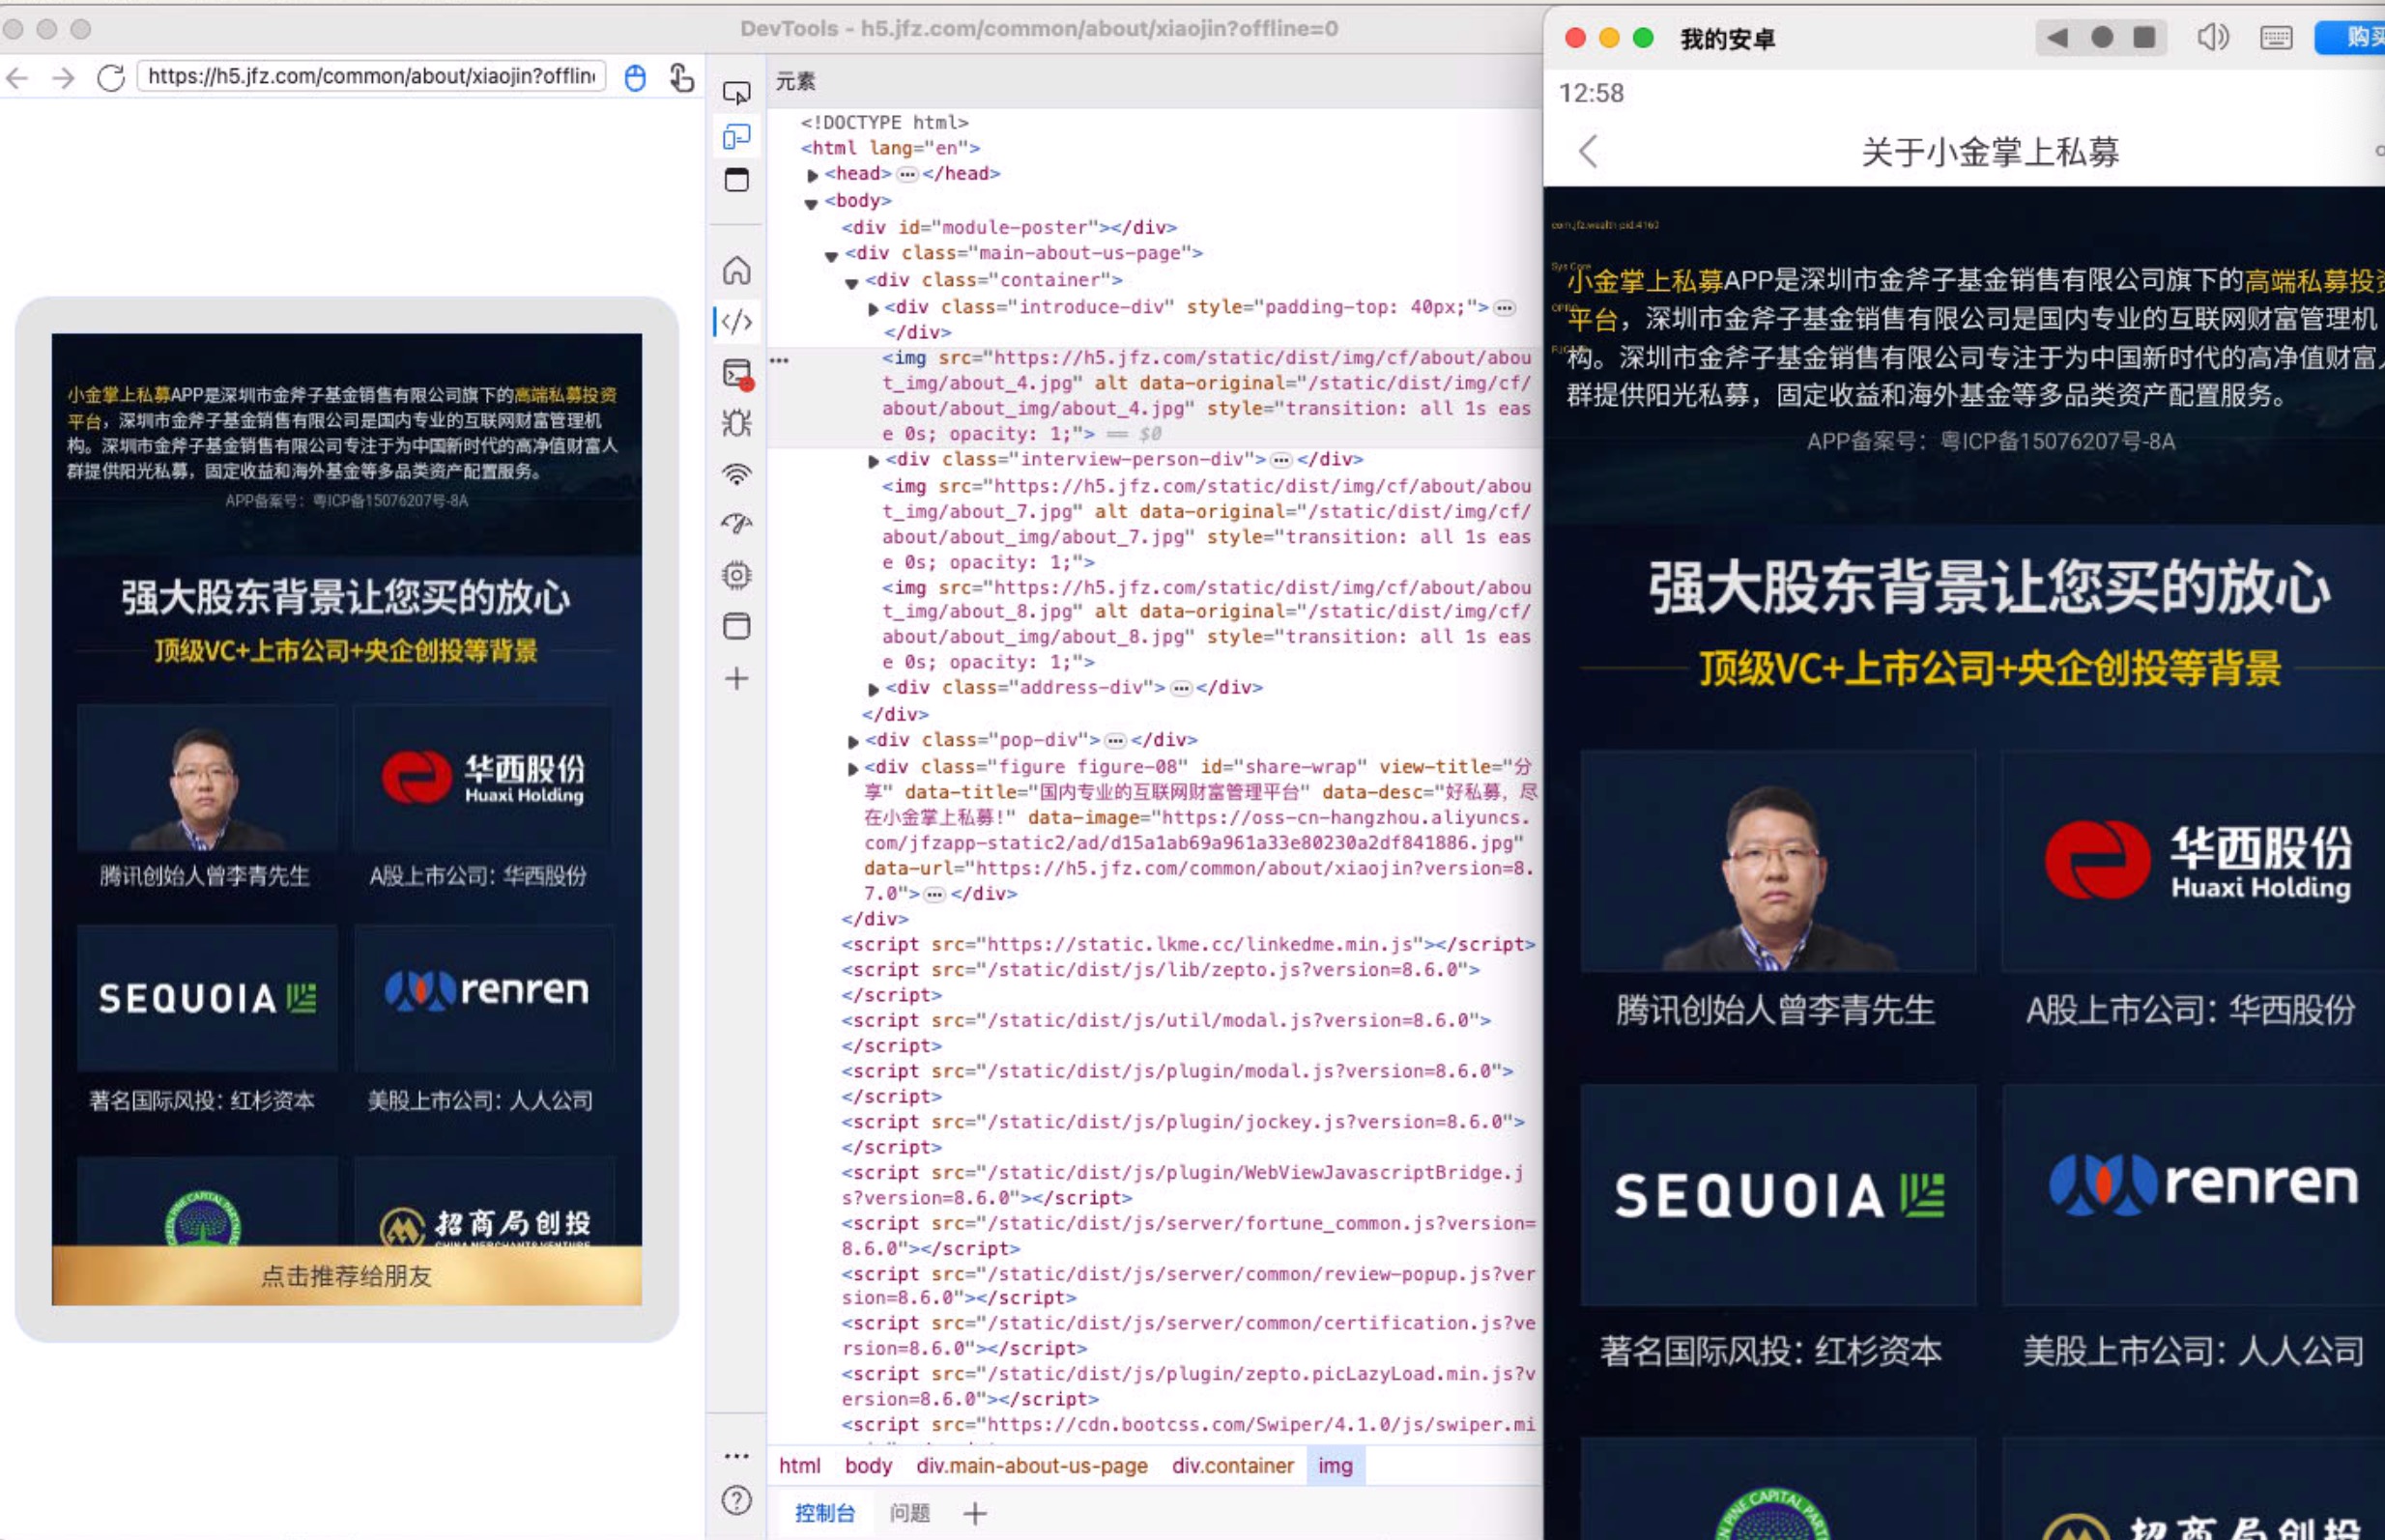
启动‘小金 app’,打开 Edge 浏览器,输入:edge://inspect/#devices,如下图:
安装
- node >= 18.0.0
- Xcode
- npm i appium
- appium driver install uiautomator2
- appium inspect
下载链接https://github.com/appium/appium-inspector/releases
启动
- 启动 appium 服务
终端,键入appium命名,启动成功输入如下:1
2
3
4
5
6
7
8
9
10[Appium] You can provide the following URLs in your client code to connect to this server:
http://127.0.0.1:4723/ (only accessible from the same host)
http://169.254.220.211:4723/
http://192.168.2.1:4723/
http://10.3.20.52:4723/
http://169.254.175.52:4723/
http://10.8.9.26:4723/
[Appium] Available drivers:
[Appium] - uiautomator2@3.7.0 (automationName 'UiAutomator2')
[Appium] No plugins have been installed. Use the "appium plugin" command to install the one(s) you want to use. - 打开 appium inspect 客户端
进行如下配置:
说明:
A. host 和 port,从步骤一获取
B. platformName: Android 或 iOS
C. appium:platformVersion: 13,
通过adb shell getprop ro.build.version.release获得
D. appium:automationName: “UiAutomator2”
E. appium:packageName: “com.cmschina.stock”
手机上,启动通过adb shell dumpsys activity top | grep 'ACTIVIT'获得,如招商证券
F. “appium:activity”: “.MainActivity”,
通过adb shell dumpsys activity top | grep 'ACTIVIT'获得
G. “appium:deviceName”: “21091116C”
通过adb devices -l获得
上述配置,综合如下:
1 | { |
How to have specific .gitignore for each git branch
https://www.linkedin.com/pulse/how-have-specific-gitignore-each-git-branch-ahmed-mohamed
通过劫持swiper中touches对象,根据方向改变里面x和y值,完整的测试示例,如下:
1 | <html lang="en"> |
Want to skip the tutorial below and dig in for yourself? Check out the repo and follow along with the instructions on the README.
Local https is awful
If you’re a web developer, it’s very likely you’ve used local dev sites to build your applications on. Something like example.test or mycoolsite.devlocal, right? When I’m spinning up a basic content site, I really don’t pay attention to wrapping it up in https. However, when you start digging into more complex applications, especially those requiring registration and logins, https is useful and sometimes downright required depending on your frontend.
Google Chrome (and most modern browsers), have taken a large stance against unencrypted http sites. This includes dev sites and those that use development TLDs like .test and .devlocal. Usually you’ll see a small exclamation point or some kind of notice in your address bar’s left corner, but that changes when authentication comes into play. You’ll see even larger notices about submitting information on an insecure website, and may even be blocked from performing that action.
A potential solution is “Let’s create local self-signed certificates to enable https on our site”. If we go searching for tutorials on how to accomplish that, there’s literally a massive amount of options out there for every major operating system. The general consensus if you’re doing something like this from the command line, is using a tool like openssl. Then, in your Nginx or Apache config file, enabling https, listening to the :443 port, and referencing that file as your ssl certificate.
This worked, kind of. On my local dev app, whenever I’d navigate to the https:// version, I’d be presented with a huge “THIS SITE IS INSECURE” full-screen pop-up. At first, it didn’t bother me all that much. I could just click a “Continue to insecure site” button, my browser would remember my choice, and I could continue through the site. Albeit with a large red insecure https badge in the address bar, it still got the job done.
Screenshot of Chrome giving an error that says your connection is not private for example.test
Then came the issue on newer versions of MacOS, where you wouldn’t even see a “Continue to insecure site” bypass button on Chrome’s popup. In order to actually get it to appear, you have to do this awful process of saving the ssl certificate to your desktop, opening it up in Keychain Access, and manually setting the trust for it. And even then, that just made the bypass button appear again, still showing that large insecure badge on your site’s address bar.
There has to be a better way.
In walks mkcert
I honestly don’t remember where I first came across mkcert. It might have been on a Reddit post, Twitter thread, or random StackOverflow answer, but I am so glad that I did.
So, what is it? Mkcert is a command-line tool that does two things:
It generates a local certificate authority on your machine.
It creates self-signed ssl certificates against that authority.
What this means is that whenever your browser loads up a development site that uses one of its generated certs for https, it’s validating that certificate against the dummy validation service installed on your machine. Therefore faking your browser into thinking it’s legitimate.
It’s magic!✨
Getting set up
Installation of the actual utility is pretty straightforward, and the package is available on Windows, MacOS, and Linux platforms. I’ll go through a brief overview of each, but for more detailed instructions I’d recommend checking out the README on the official repo.
Let’s get started!
For MacOS using Homebrew:
brew install mkcert
brew install nss # only if you use Firefox
For Windows using Chocolatey:
choco install mkcert
For Linux using Linuxbrew:
brew install mkcert
💥 Bam! Now you have the tool installed on your system and ready to use in your terminal.
Creating and using a certificate
If this is your first time using mkcert, you’ll need to run it with the install flag. This only needs to be done once, and it creates the local certificate authority that we talked about earlier.
Just open up your terminal, and run:
mkcert -install
You should see the following appear if everything went successfully:
Created a new local CA at “/Users/andrew/Library/Application Support/mkcert” 💥
The local CA is now installed in the system trust store! ⚡️
The local CA is now installed in the Firefox trust store (requires browser restart)! 🦊
Now that we have our authority installed, we can create an actual certificate. I recommend first navigating in your terminal to your project’s directory, maybe even creating a new directory called mkcerts or something similar.
Then, it’s just a matter of running the command:
mkcert example.test
Replacing example.test with whatever local domain you’re using to display your site on.
You can also use IP addresses, or even wildcard subdomains. Chaining them together in the same call, if you’d like one certificate for multiple different domains on one site:
mkcert example.test “*.example.test” 127.0.0.1
And if everything goes well, you should have two new files in the directory you ran that command in, example.test.pem and example.test-key.pem. Let’s use them!
All we have to do is make them accessible to our Apache or Nginx config files, and use them like we would an actual certificate from Let’s Encrypt or another authority.
In Nginx, alongside a prepared ssl block, that might look like:
server {
listen 443 ssl;
server_name example.test;
root /Users/andrew/Sites/example.test/public;
ssl_certificate /Users/andrew/Sites/example.test/mkcerts/example.test.pem;
ssl_certificate_key /Users/andrew/Sites/example.test/mkcerts/example.test-key.pem;
}
And in Apache:
<VirtualHost 127.0.0.1:443>
ServerAdmin webmaster@example.test
DocumentRoot /Users/andrew/Sites/example.test/public
ServerName example.test
SSLEngine on
SSLCertificateFile /Users/andrew/Sites/example.test/mkcerts/example.test.pem
SSLCertificateKeyFile /Users/andrew/Sites/example.test/mkcerts/example.test-key.pem
All that’s left to do is restart the webserver process, and navigate to your example site with https:// in your browser of choice. You should then be presented with a wonderful green secure badge in the address bar! ✅
That’s all folks
Hopefully after going through this article and trying out mkcert yourself, you’ve been converted to the easier way of creating and using self-signed ssl certificates to enable https on your development websites.
https://dev.to/aschmelyun/using-the-magic-of-mkcert-to-enable-valid-https-on-local-dev-sites-3a3c
Testing SSL (LetsEncrypt certificate and loopback domain)
General approach
This sets up a publically-available domain that loops back to localhost IP address 127.0.0.1. For example, this address could be localhost.kch8.com if we controlled the kch8.com domain. This relies on having a public domain name whose DNS records you can control. We can then generate LetsEncrypt certificates for this domain.
Our HTTP server runs on localhost:80 (default HTTP port). This lets us visit http://localhost.kch8.com in a web browser and see the server running on localhost:80.
We then run an HTTPS proxy server on kch8:443 (default HTTPS port) that uses the LetsEncrypt certificates we generated for localhost.kch8.com. Visiting https://localhost.kch8.com hits the proxy, which returns the correct certificates meaning the browser displays the “Secure” message. The proxy then passes the request through to the HTTP server.
Issues
- it’s very convoluted
- private keys etc need to be distributed to any machine running the server
- must have control of DNS records on domain
- LetsEncrypt certificates expire so the whole process must be repeated to get new ones (steps 5-9 below)
- …?
Steps
Create the loopback A record for
localhost.kch8.com:In your DNS provider’s control panel:
1 | Type: A |
- After a while, the following command:
1 | $ dig a localhost.kch8.com. |
- Install LetsEncrypt’s certbot so we can generate a valid SSL cert:
1 | brew install certbot |
- Generate a SSL cert for your domain using the DNS challenge type which means you won’t need to have a server running on this domain:
1 | sudo certbot certonly --config-dir . --work-dir . --logs-dir . --manual --preferred-challenges dns |
- Enter the domain name when prompted:
1 | localhost.kch8.com |
Ok with logging? Yes
Add the DNS record and TXT value in your DNS provider’s control panel as requested by certbot. Do not press Enter until it’s been deployed.
There are a few more questions then certbot will have generated files in the directory you ran the command in:
1 | live |
- Use the redbox proxy to point to the generated certificates and start on port 443:
1 | sudo node redbird-proxy.js live/kch8.example.com/ |
- Set the
API_URLin.envto:
1 | API_URL=https://locakch8lhost.example.com/api |
- Start HTTP client on port 80 (edit .env to set PORT=80)
1 | sudo npm start |
The HTTPS server should be available without any browser warnings. HTTP version will be available on http://localhost.kch8.com.